It’s been a while since OpenAI launched Sora to the public (available to ChatGPT Plus users, by the way), and I finally got a chance to experiment with it. Spoiler alert: it’s incredible!
I spent some time playing around with it, and here’s one of the results I came up with:
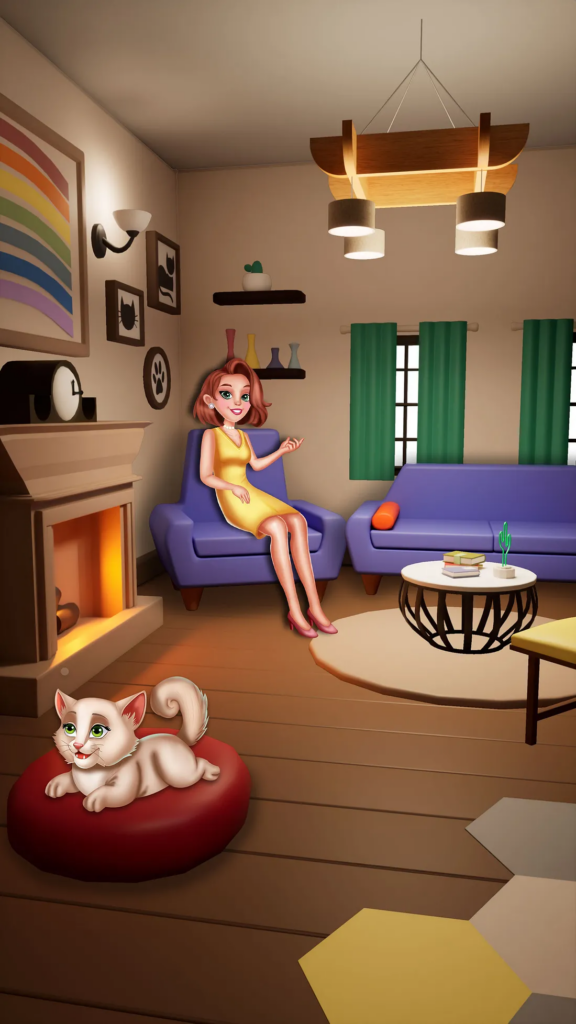
This is a scene from a puzzle game we’ve been working on. The game has a unique twist — it combines classic puzzle-solving mechanics with a meta-layer where players can fix up different parts of a room and earn stars as rewards. Think of it as a mix of puzzles and home improvement, similar to some of the trending games out there right now.
So, here’s how I experimented with Sora: I kept it simple — just straightforward prompts, nothing too fancy or overly detailed.
Prompt: animate the girl and the cat. move the camera and keep the rest of the scene static (attached the image as the source)
Result:
Prompt: animate this scene (attached the image as the source)
As you can see, it’s pretty unbelievable how Sora has managed to take the entire image, turn it into a three-dimensional world, and move the character while keeping everything spot-on with the static image. The attention to detail, from the shadows to the textures, is absolutely flawless.
Merging the two videos and adding some sound effects turned it into a solid video that’s perfect for use in marketing materials or as an engaging landing video before the game kicks off.
End Result: 🥁🎶
I’m honestly fascinated by the potential of Sora. The ability to use 2D artwork as the source opens up a whole new world of possibilities!
Hi, I’m Saad Khawaja, a full-stack software engineer specializing in multiple tech stacks. As a game developer always on the lookout for new innovations, I’ve been diving into some exciting AI technologies that are shaping the future of our industry. If you’re aiming to level up your game development skills in 2024, here are the top AI concepts and tools you should explore:
Generative AI in Games: Shaping the Future of Interactive Entertainment
Generative AI is revolutionizing the gaming industry by introducing unprecedented levels of creativity, efficiency, and player engagement. By leveraging machine learning models to create content, developers can now craft expansive worlds, dynamic storylines, and adaptive gameplay experiences at scales that were previously unimaginable. Let’s break down how generative AI is transforming the gaming landscape and what it means for the future of interactive entertainment.
Concepts/Techniques
1. Procedural Content Generation (PCG) 🌟
Ever wanted to create endless levels or unique worlds on the fly? PCG uses AI algorithms to dynamically generate game content, ensuring that players always have something new to explore. Imagine sprawling dungeons, vibrant landscapes, or infinite terrains that adapt to player actions.
Generative AI can dynamically craft narratives based on player actions. Instead of pre-written story branches, AI systems write dialogues, create plot twists, and introduce characters that adapt to individual playstyles, ensuring no two playthroughs are the same.
📚 Key Tools: Inkle, AI Dungeon, OpenAI GPT-4
3. Realistic Character Behavior 🌟
AI models can generate unique character models, animations, and behaviors, giving developers tools to populate their games with lifelike NPCs. Smarter AI-driven behavior systems enable NPCs to adapt intelligently, creating more immersive interactions and challenging gameplay scenarios.
By analyzing player behavior in real-time, generative AI adjusts the game’s difficulty, environment, or objectives. This keeps players engaged by seamlessly balancing challenge and enjoyment.
📚 Key Tools: Ludo.AI, Scenario
5. Music and Soundscapes 🌟
AI-powered tools compose adaptive soundtracks that evolve based on in-game events or player progression, heightening immersion. Similarly, AI generates ambient soundscapes that react to the game world dynamically.
📚 Key Tools: AIVA, Magenta Studio, Jukedeck
Tools
1. Scenario 🌟
Want to give your game a personalized touch? Scenario helps create an engaging gamer experience by training AI models according to your designs and patterns. Just upload your training data, and let the AI handle the rest.
📚 Key Tools: Scenario
2. Ludo.AI 🌟
Imagine a game that adapts to the player’s skill level and interests. Ludo.AI analyzes player behavior to personalize their experience and generate creative ideas and elements.
📚 Key Tools: Ludo.AI
3. Rosebud AI 🌟
What if you could create game assets and code by simply providing text descriptions? Rosebud AI transforms prompts into playable game content, saving you time and costs.
📚 Key Tools: Rosebud AI
4. Promethean AI 🌟
Need rich 3D environments? Promethean AI is especially popular among independent developers for its ease of use and licensing options, making the creation of 3D environments a breeze.
📚 Key Tools: Promethean AI
The Future of Generative AI in Games
As generative AI technologies continue to evolve, their role in gaming will expand. Emerging trends include:
Collaborative AI Tools: Systems where developers work alongside AI to co-create assets, blending human creativity with machine efficiency.
Player-Centric Design: AI systems that respond to individual player preferences, crafting unique game worlds and stories on the fly.
Cross-Platform Integration: Using generative AI to seamlessly adapt games for different platforms, ensuring consistent quality and experience.
By diving into these AI technologies and tools, you can create more dynamic, engaging, and immersive experiences for players. The future of game development is incredibly exciting, and AI is at the heart of it!
So hear me out… Has this ever happened to you? You’re looking for an icon or an image to use in Unity. You open up a website, search for an image, and instead of saving it, you right-click and Copy image.
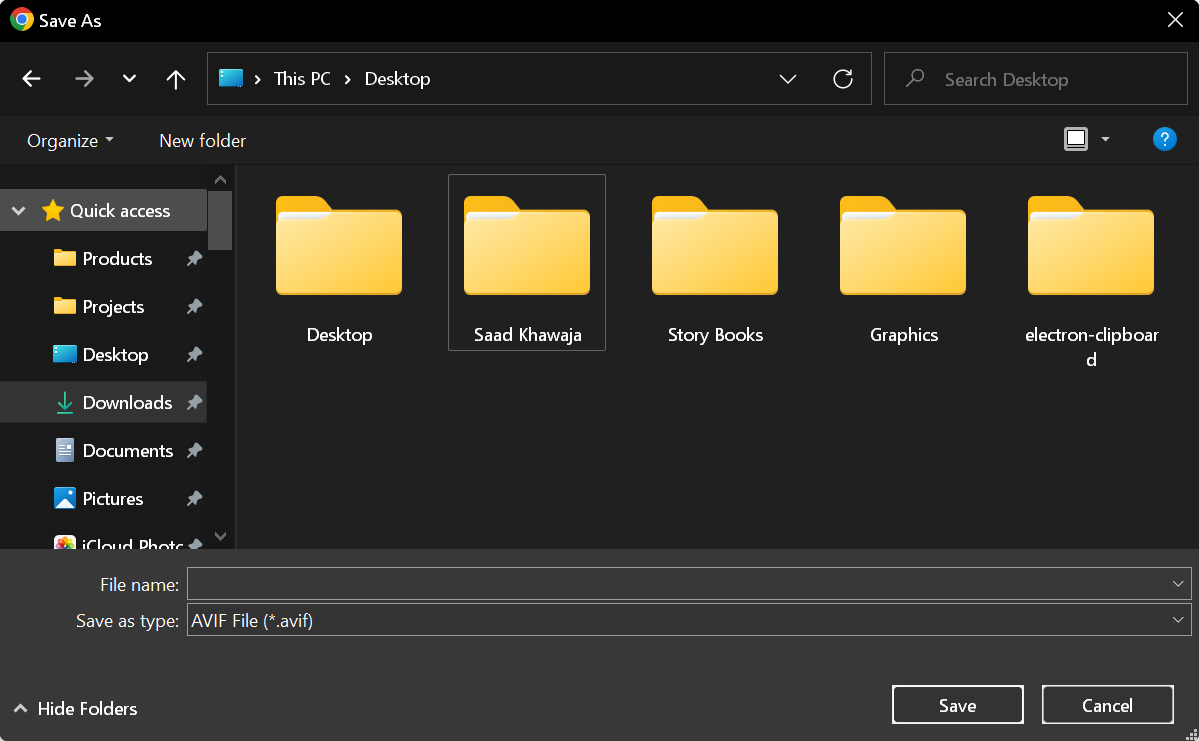
So far, so good, right? Now you go back into Unity, and oops, you can’t paste it because, well, it’s not possible. The only thing you CAN do is go back to the website, right-click, and select “Save Image As.”
Now you’re going to see this familiar dialog (attaching a Windows screenshot, but Mac users can relate as well).
There are two options now:
You try to find the project directory and save the image there directly.
You save it in an easy, accessible folder and after that, drag and drop the file into the Unity project window.
Both these options have some issues.
#1: You’re never able to find the project folder. You can’t have all your projects in your favorites/quick access, and it’s just a lot of trouble to navigate your way into the Sprites or whatever folder you need to (often again and again because for some reason the OS forgets the last path)
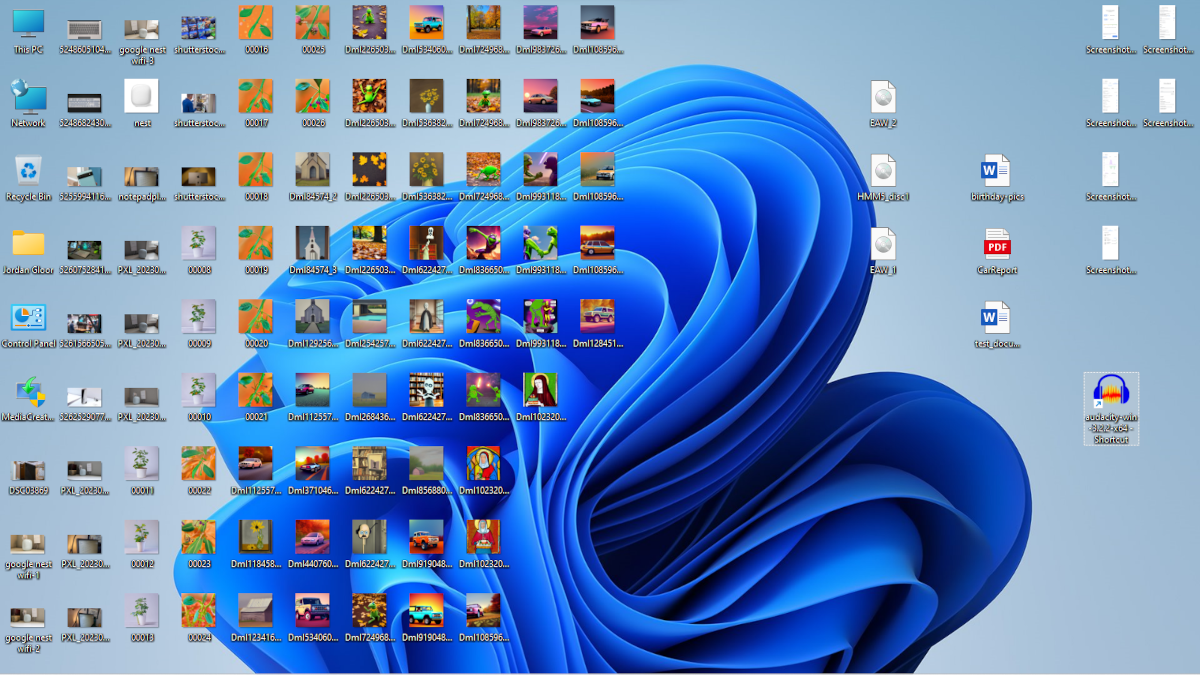
#2: You’re going to end up with a desktop looking like this.
Hey, and what if the file is a webp file? You might need to convert that to a .png before you can add it in Unity. Or what if the filename looks like icon_452_Clock_final_final1_final.png when it’s saved? There are a lot of unnecessary clicks, keypresses, and frustration.
That’s something I faced for many months until I decided …
There’s got to be a better way!
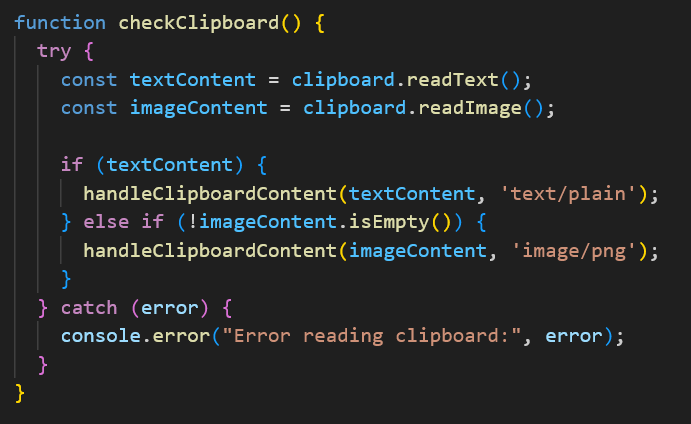
First, I looked for a ready-made solution. None exist. Okay, no problem — let’s create an editor utility that reads the clipboard. Sounds easy right?!
An editor utility in Unity is a custom tool or script that enhances the Unity Editor’s functionality, streamlining the development workflow. These utilities can automate repetitive tasks, create custom inspectors, or add new features to the editor interface.
All I need to do is use EditorGUIUtility.systemCopyBuffer and get the image data?
Well, unfortunately you CAN’T read the raw clipboard data. Yes, you can get text, but not an image.
After numerous back-and-forth and trying multiple libraries, I gave up. There is no way this can be done just within the Unity editor. We need to be able to read the entire clipboard and perform certain operations that are just not exposed in Unity editor scripting.
So drum roll… 🥁 presenting the “actual” use of multiple tech stacks that I mentioned in the first line.
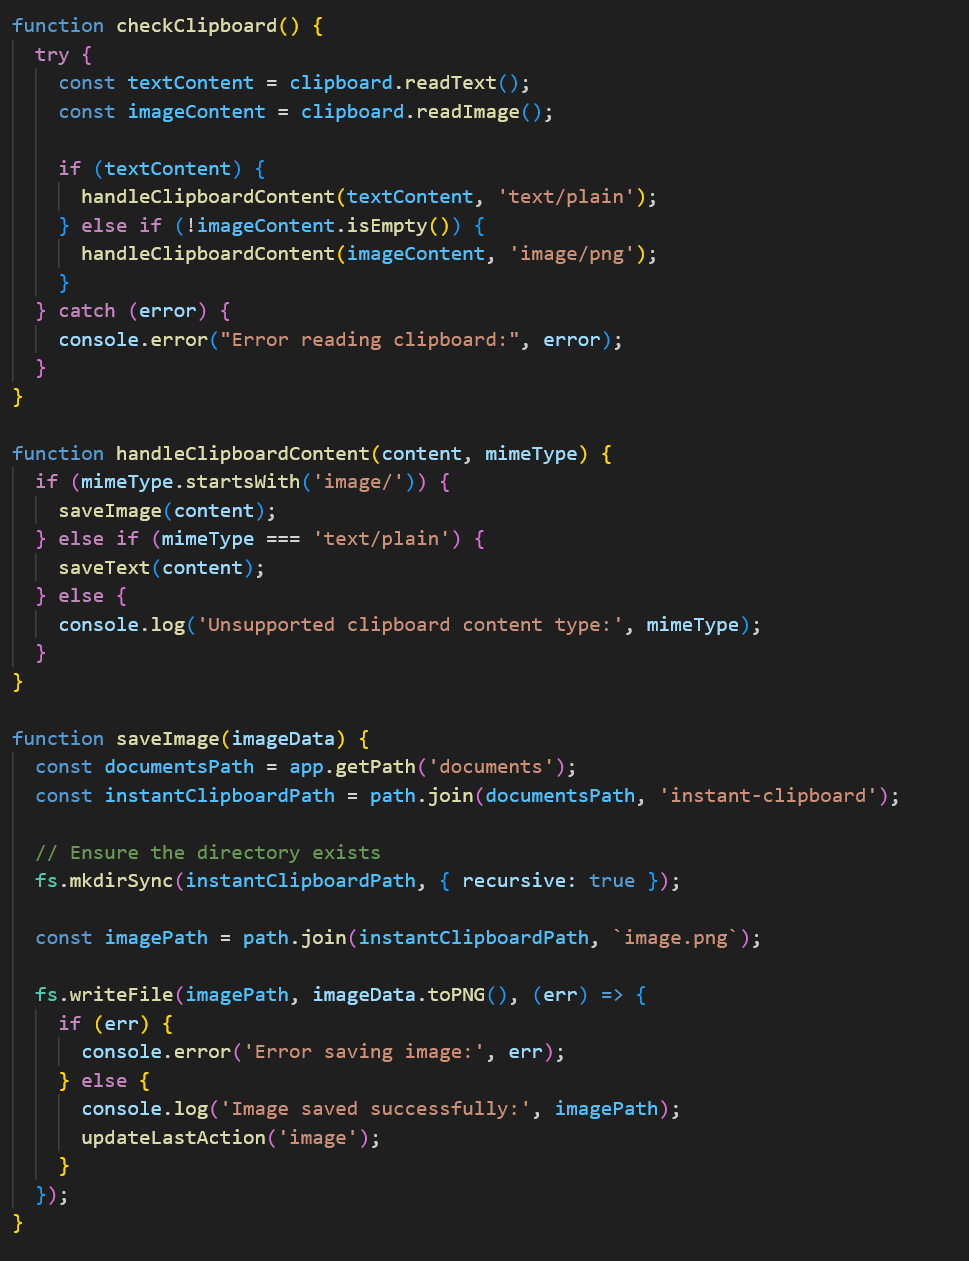
I turned to my favorite framework for creating desktop apps: ElectronJS.
Now you can read the clipboard using the built-in Electron.Clipboard library. It has built-in functions called readText and readImage that do pretty much what they are supposed to.
Okay, so now I can get the image that I’ve copied in an ElectronJS desktop application. Now I need to transfer this image to my Unity project/editor.
The tricky thing here is inter-app communication. Or in my case, standalone Electron app to Unity editor script communication.
Still with me? Let’s recap the problem and my proposed solution clearly now:
Problem: I want to be able to paste any image that I’ve copied into the Unity project window (preferably in the folder that is currently open). I just want to be able to copy images from anywhere (web browser, Photoshop etc. ) and paste them in Unity without any complication.
Proposed Solution: Electron app and Unity will work in tandem. The Electron app will monitor and manage the clipboard — if there is an image copy event triggered on the OS, the Electron app will process it and create an image file in a common folder.
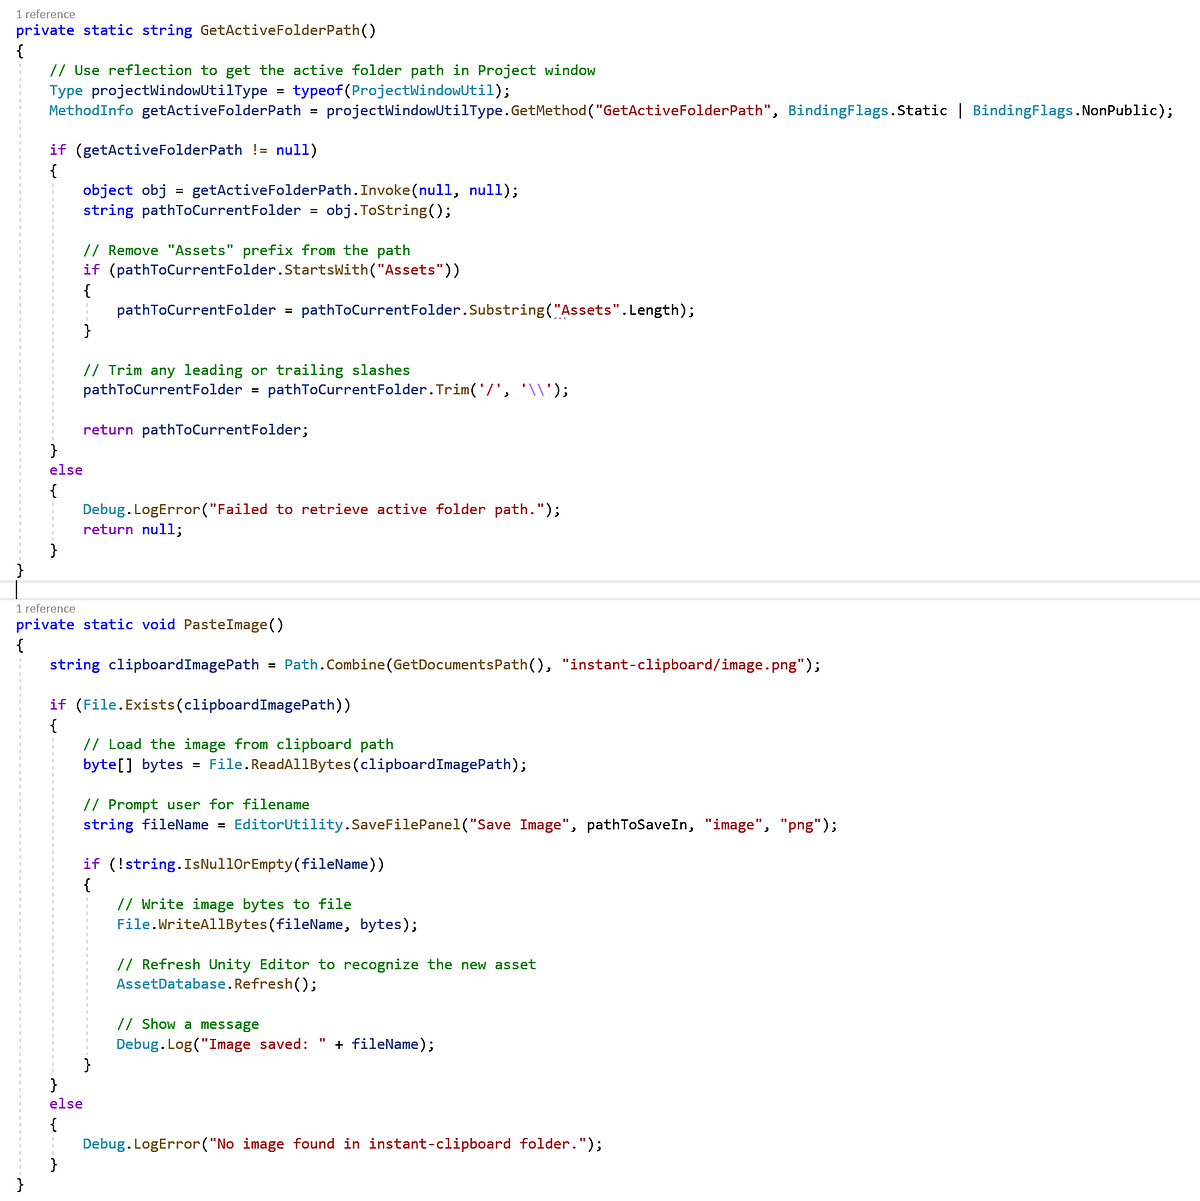
The Unity editor script will monitor the Ctrl + V keypress (only if inside the project window) — if triggered, the function will copy the image (created by the ElectronJS app) from the common folder and paste it in the current active folder inside the Unity project.
Challenges:
How to capture Ctrl + V hotkey inside the project window of the Unity Editor.
How to capture the clipboard onChange event in ElectronJS.
Image metadata is not saved in the clipboard, so what should the name of the image be?
Handling all error scenarios: What if text is copied? What if the image is in webp format? etc.
So, it took the whole of Saturday (20th July 2024), but I managed to do it! Yay! 😺
Some workarounds (or “jugars” as we call them in my native language):
Clipboard change event does not exist. The only way to monitor the clipboard is to have a function running (setInterval) that compares the clipboard data to the last data.
Ctrl + V inside the project window of Unity can only be done using Reflection. Unity doesn’t expose this function, so we have to use reflection to peek inside the class and get its value.
We cannot get the name of the image; that’s just not stored in the clipboard. Instead, what we can do is quickly show a dialog and ask the user to enter the name of the image that they are pasting. This is actually better because the developer can use their appropriate naming convention instead of leaving it for later and ending up with a whole bunch of sprites with ridiculous names.
There is no need to show the Electron app. So I decided to put it into the system tray.
Here is another look at the code in Electron that handles the clipboard.
And here is the C# snippet that handles the Ctrl + V hotkey and pastes the image inside the Unity window.
Results
It works as expected. The Electron app runs in the background like a service — and does it’s job of saving images to a common folder. Unity editor works like a charm as well — capturing the paste hotkey and using file operations to paste the image.
So while wrapping up, I had another AHA moment.
When I completed the image paste functionality and tested it multiple times, including on a live project I was working on, I figured, what if we had the ability to paste different files as well? — and not just images?
For example, if we’re copying some code from ChatGPT — we have to create a C# file, name it, change its location and then paste the code … etc.
Q: What if I could copy the code generated by ChatGPT and simply paste (CTRL + V) it inside Unity, and that would create a .cs class for me?
Q: What if I could copy a JSON file and just paste it to create a .json file in the current project window folder that I have opened?
So, here it is, presenting — Instant Clipboard 1.0.
Since it’s AI season, let’s briefly see how we can add AI using Unity in games. There are other ways of using AI to aid game design but let’s only focus on development for now.
AI in game development is all about using algorithms and machine learning techniques to make non-player characters (NPCs) and game environments smarter. Instead of relying on scripted behaviors, AI-driven entities can learn, adapt, and make decisions based on what players do. This leads to gameplay that’s more realistic and engaging.
Unity and AI
Games have always had some form of AI in them since forever. Whether it’s making NPCs, pathfinding etc. If you’ve not used AI in Unity before, I suggest checking the following out:
ML-Agents Toolkit: Unity’s Machine Learning Agents (ML-Agents) toolkit is great! It lets us create intelligent agents using reinforcement learning, allowing them to learn from their interactions within the game environment. Learn more about ML-Agents.
NavMesh: Unity’s Navigation Mesh (NavMesh) system helps NPCs find their way around complex terrains and avoid obstacles dynamically. It’s like giving your game characters a GPS! Explore NavMesh.
Behavior Trees: With behavior trees, we can model complex decision-making processes for NPCs without having to write tons of code. This makes it easier to create sophisticated AI behaviors. Understand Behavior Trees.
Third-Party Integrations: Unity’s flexibility means we can easily integrate third-party AI frameworks like TensorFlow to create custom AI solutions. Integrate TensorFlow with Unity.
The Next Steps
After you’ve done a bit of tinkering with the above, this is what’s happening right now.
Adaptive Gameplay: AI can adjust the difficulty based on how good you are, making the game more personalized. Imagine a shooter game where enemies get tougher as you improve—keeps things interesting, right?
Smart NPCs: AI-powered NPCs act more lifelike. They learn from their surroundings and player interactions, making their actions less predictable and more realistic. This makes the game world feel more alive.
Procedural Content Generation: AI can generate game content on the fly. Whether it’s levels, maps, or even storylines, AI tailors everything based on player preferences and behaviors. Read about Procedural Content Generation.
Player Analytics: AI analyzes player data to give us insights into behavior, preferences, and pain points. This helps us tweak game mechanics and design for a better player experience. Discover Player Analytics.
The Future?
The future looks bright for AI in Unity-based games, and here’s why:
Deep Learning and Neural Networks: As deep learning tech gets better, our NPCs will be able to handle even more complex tasks and make decisions like real humans.
AI-Driven Storytelling: Imagine games where the storyline evolves based on your choices, thanks to AI. This could lead to some seriously immersive experiences.
Real-Time Adaptation: Future AI systems might adapt the game world in real-time, responding to player actions in ways we can’t even imagine right now. It could change environments, NPC behaviors, and mission objectives on the fly.
VR and AR: Combining AI with VR and AR could create some mind-blowing experiences. Imagine intelligent agents in VR/AR environments interacting with players in super realistic ways.
Wrapping Up
AI is set to revolutionize game development. By leveraging Unity’s AI capabilities, we can create games that are more immersive, adaptive, and engaging than ever before. As AI technology continues to advance, the possibilities for Unity-based games are truly limitless. The future of gaming is intelligent, and it’s being built with Unity.
Let’s hope we’re not told to charge per install per NPC in the future though. xD
The “No valid user created or default window found” error in Unity typically arises from issues related to corrupted or missing files in the Unity layout folder. This can be caused by improper shutdowns, system crashes, or recent updates.
“Revert Factory Settings” option does nothing to resolve this error so if you’re getting this error, chances are you won’t be able to open your project at all.
To resolve this error, you can delete the Project\Library\ArtifactDB file. Here’s a detailed step-by-step guide:
Close Unity: Ensure that Unity is completely closed before proceeding with any changes.
Navigate to the Library Folder: Open your project folder and navigate to the Library directory.
Delete the ArtifactDB File: Locate the ArtifactDBfile within the Library folder and delete it.
Reopen Unity: Launch Unity again and open your project. Unity will rebuild the necessary files, potentially resolving the issue.
In some cases, you might also consider the following steps:
Delete the Entire Library Folder: If the above method does not work, try deleting the entire Library folder. Unity will recreate this folder when you reopen the project, though this process might take some time.